Introduction:
A weak air conditioner can ruin your driving comfort, especially during hot weather. One of the most common reasons for poor AC performance is low refrigerant—often referred to as “Freon.” Recharging your car’s AC system isn’t just about adding refrigerant; it’s about doing it safely, correctly, and with the right tools.
In this detailed guide, written in the voice of an experienced technician, you’ll learn how to properly and safely add Freon to your car’s AC system.
🔧 What Is Freon and Why Is It Used?
Freon is a general term for refrigerants used in automotive air conditioning. It circulates through the system, absorbing heat from the cabin and releasing it outside, keeping your car cool.
Common refrigerants:
- R-134a – Used in most vehicles from 1995–2020.
- R-1234yf – Found in newer models due to environmental regulations.
Note: Always use the type specified by your vehicle’s manufacturer.
🧰 Tools You’ll Need
To recharge your car’s AC safely and correctly, gather:
- The correct refrigerant type
- A recharge kit (can + gauge + hose)
- Safety gloves and glasses
- A thermometer to measure vent temperature
✅ Step-by-Step Guide to Adding Freon
Step 1: Identify the Refrigerant Type
Open your car’s hood and look for a label (usually near the radiator support or firewall). This label tells you the exact refrigerant type your vehicle uses. Never mix types.
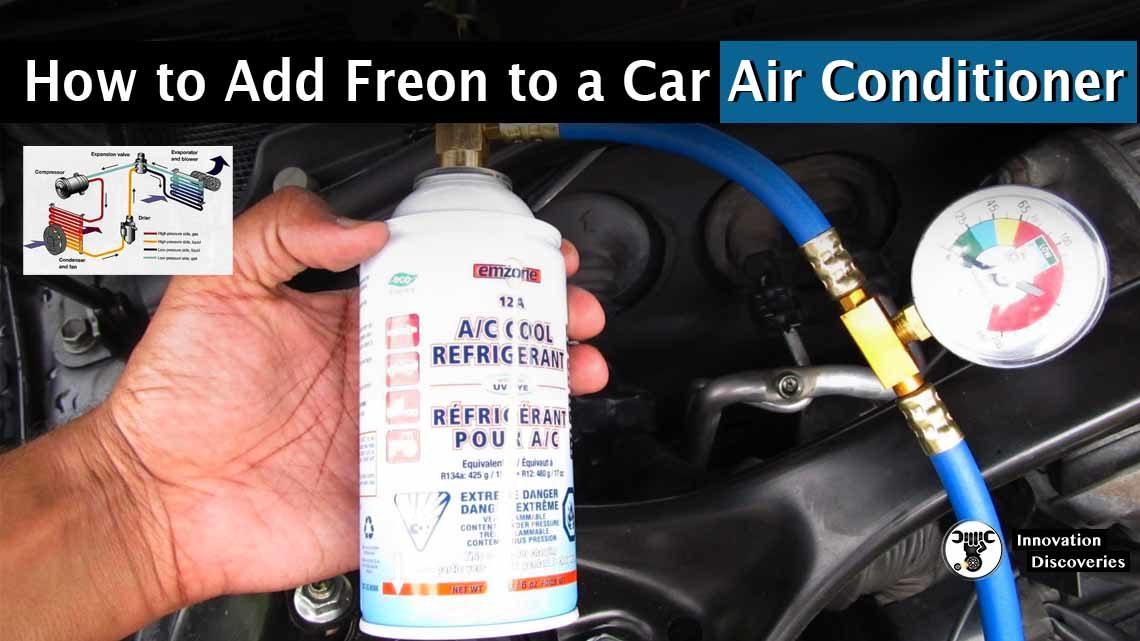
Step 2: Locate the Low-Pressure Service Port
This is where you’ll connect your recharge hose. It’s usually found on the thicker aluminum AC line and may have an “L” cap. The high-pressure port (smaller line) is not used for recharging.
Step 3: Prepare the Vehicle
- Start the engine.
- Set the AC to maximum cold and fan speed to high.
- Let the engine run for a few minutes to allow the AC compressor to engage.
Step 4: Connect the Recharge Kit
- Shake the can well.
- Attach the recharge hose to the low-pressure port.
- Check the pressure gauge to see if the system is undercharged.
Step 5: Add Refrigerant Safely
- Hold the can upright.
- Press the trigger or valve to release refrigerant.
- Add in short bursts, checking the pressure after each.
- Stop when the pressure reaches the optimal level based on outside temperature (most kits include a chart).
Step 6: Monitor Cooling Performance
- Use a thermometer in the AC vent.
- You should notice cooler air coming through as refrigerant circulates.
- If it doesn’t cool or if the compressor doesn’t engage, further diagnosis is needed.
Step 7: Disconnect and Seal
- Once finished, release the trigger.
- Detach the hose.
- Replace the low-pressure port cap securely.
- Check for leaks using soapy water if needed.
⚠️ Safety and Pro Tips
- Never overcharge – Too much refrigerant can damage the compressor.
- Use gloves and goggles – Freon can cause frostbite or eye injury.
- Don’t recharge if there’s a known leak – Repair leaks first.
- Don’t mix refrigerants – Always stick to what your vehicle specifies.
🔍 When to Seek a Professional
Adding Freon is only a temporary fix if there’s an underlying issue. See a certified AC technician if:
- The system quickly loses pressure again.
- The compressor fails to turn on.
- You see visible oil leaks around AC components.
- You’re unsure about the refrigerant type or amount.
⚠️ Technician-Approved Safety Checklist
Cautions and Tips
1. Safety First:
Always wear safety glasses and gloves when working with refrigerants to protect your eyes and skin from potential contact.
2. Follow Manufacturer Guidelines:
Refer to your vehicle’s owner’s manual and follow the manufacturer’s guidelines for adding refrigerant. Using the wrong type or amount of refrigerant can damage your AC system.
3. Check for Leaks:
Before adding Freon, inspect the AC system for any signs of leaks, such as oily residue around fittings or hoses. Address any leaks before proceeding with the recharge to prevent Freon from escaping and causing further damage.
4. Avoid Overcharging:
Adding too much Freon can cause excessive pressure within the AC system, leading to potential damage. Use a pressure gauge to monitor the system’s pressure and add Freon gradually to avoid overcharging.
5. Monitor System Performance:
After adding Freon, pay attention to the performance of your car’s air conditioner. If you notice any unusual noises, a decrease in cooling efficiency, or other abnormalities, stop the process and seek professional assistance.
6. Use Caution with DIY Kits:
While DIY refrigerant recharge kits are available, they may not always provide accurate pressure readings or proper instructions. If you’re unsure about using a DIY kit, it’s best to consult a professional mechanic.
7. Proper Disposal:
Dispose of any unused refrigerant or empty canisters properly according to local regulations. Improper disposal can harm the environment and pose health risks.
8. Seek Professional Help if Needed:
If you’re uncomfortable or unsure about adding Freon yourself, it’s always best to seek assistance from a qualified mechanic or HVAC technician. They have the expertise and equipment to safely recharge your car’s AC system.
By following these cautions and tips, you can add Freon to your car’s air conditioner safely and effectively, ensuring optimal performance and comfort during your drives.
✅ Final Thoughts
Adding Freon to your car’s air conditioner can improve performance quickly—if done properly. It’s not just about cooling air; it’s about understanding pressure levels, system compatibility, and safe handling. Whether you’re a DIY enthusiast or a budding technician, this guide gives you the confidence to do it right.
Also, read:
- 3 Bad Idle Air Control Valve Symptoms (and Replacement Cost)
- Car Cooling System – What To Do To Keep Its Cool?
Discover More:

DOWNLOAD