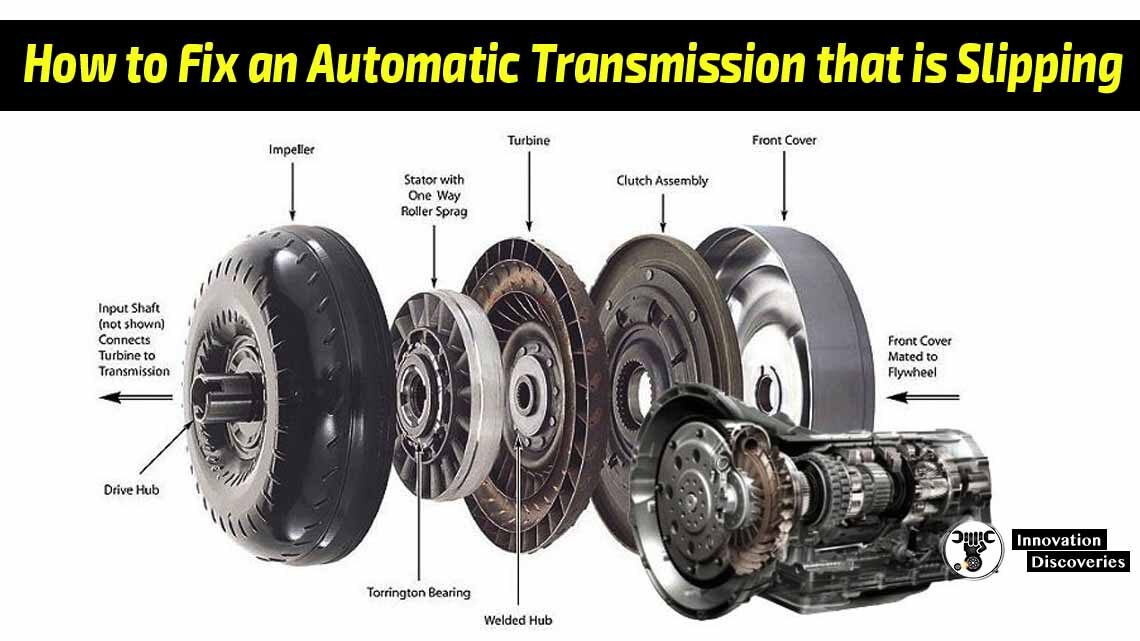
Slipping is a technical term widely used in the automobile industry. This term is applied to the transmission that does not shift gears on time. This phenomenon is expressed as a lag in
Upshifting(delaying in change gear). This article aptly describes the process with which you can fix your automatic transmission that is slipping or lagging.
Most of the manufacturers prescribed its customers the strict service maintenance procedure which should be followed in first hand to prevent this issue. Manufacturers are of the view that performing this service every 25,000 miles, if your vehicle function under a severe driving environment, will prevent the breakdown of an automatic transmission.
Few are given some of the severe driving situations or conditions:
- When your vehicle functions primarily in stop and goes traffic surroundings most of the time
- Or when your vehicle indulges in more than half the time in stop and goes traffic surroundings in ambient temperature is 90°F or higher.
- Use your vehicle in terms of tugging other vehicles, i.e. towing.
- Intensive driving in dusty surroundings
- If a vehicle is frequently drove in hilly or mountain areas.
The fluid in automatic transmission gets overheated and become grimy in these severe driving conditions. With the presence of impurities in the fluid, it loses its ability to protect the transmission’s flimsy parts which will later receive damage.
Examining the transmission fluid of the vehicle used in strict or severe conditions will occasionally help us locate the problem. If the break down has already occurred and you are experiencing lagging in the transmission, replacement of the fluid could also serve the purpose.
Following are given some of the steps, which are helpful not only to fix the slipping problem of the automatic transmission, and also to perform maintenance program to fight off the problem.
These steps can be used in more than one situation. Like, either you are working on slipping of an automatic transmission or on a fluid leak from around the transmission pan. You use the same procedure.
- Drive for about 10 miles to heat up the transmission fluid.
- Turn off the engine and halts the car on a level surface. Make sure the transmission shift selector is in a neutral place. Apply the parking or hand brake.
- Lift up the front of the vehicle with the help of jack.
- Adjust the front of the vehicle on the support stands carefully.
- Place the wedges against both the rear tires, to avoid rolling back of the vehicle.
- Take a large pan and place it under the transmission pan.
- Slowly loosen the corner bolts first; this will help fluid to drain out from the corner to the dirt pan, instead of making the mess all over.
- Unbolt all the remaining bolts and take out the transmission pan.
- Before removing the fluid that remains in the bottom, examine it closely for particles, color, and odor. Splash the fluid back and forth. The presence of brass or black particles is usual. However, if you find some bigger pieces, collect a sample and take it to the mechanic. The mechanic will be in a clear position to suggest what should be done to avoid this in the future. Apart from this, the fluid color should be red with muddy looks and odors like varnish. In this case, filling the transmission with fresh fluid may sort out a slipping condition. By the way, if the fluid is white, the transmission oil cooler has a leak that is allowing coolant to mix with transmission fluid. Take the services of your mechanic to replace the cooler.
- Scratch off the gasket from the frame (rim) of the transmission pan and from the frame of the transmission body. This material must b removed or in another case, it will not let the pan to settle properly to the transmission and hence will cause a leak.
- Clean or wash the pan with the help of using a nonflammable solvent, easily available from an automobile store.
- Look out for fluid filter inside the transmission. It is not difficult to locate. Open the bolts and take the filter out. Take a look at the filter, if it is made of felt or paper substance, put it back. It is made of metal, clean it properly, and replace it.
- Take a new gasket and with ample care place the gasket on the frame or body of the transmission pan so that the gasket lies straight during this process. Finger tight the bolts.
- Make use of a wrench to fasten all the bolts. Keep notice that not a single bolt left unfastened.
- Take out the fluid dipstick of transmission and wipe it with a clean thread.
- Keeping in view the owner manual guide, take a recommended fluid type and pour it in the dipstick tube. Using non recommended fluid type may cause damage.
- After pouring fluid to a certain level, insert the dipstick into the tube and pull it out to see the fluid level. Keep filling the tube until the fluid level in the tube reaches the required level on the dipstick.
- Turn on the engine and let it idle for some time. Now keep your one foot firmly on the brake to avoid movement. Start shifting the gear lever with certain pauses between all the shifts. Set the gear lever back to neutral or park position.
- Switch off the engine and pull out the dipstick to check the level. If it has dropped below the required level, add enough fluid to bring it back to the given mark or a little below. Excessive amount of fluid may also cause the severe damage. So, be alert not to fill the fluid more than required.
- Examine the fluid level and leakage over the next few days. If you find any traces of drops of fluid at the parking place or the drop in fluid level, the pan must be leaking. You need to tighten the bolts, if the problem persists, you may need to replace the gasket for possible leaking.
All the old fluid never drains out of the transmission during draining process. Most of the time, some fluid will be trapped in torque converter.
In case, if the torque converter in your vehicle does not have a drain plug, you will have to repeat the drainage process more after driving the vehicle in the addition of every 5000 miles.
The easiest solution to avoid this strain is to install a 1/2-inch threaded drain plug in the transmission pan.
Once the drain plug is installed in a transmission pan, drive the vehicle for excessive mileage, for example up to 5000 miles so that the new fluid gets to mix with the old fluid left in the torque converter.
Now you can easily release fluid out of the torque converter by unbolting the drain plug.
Read More:
- 3 Common Symptoms of Low Power Steering Fluid
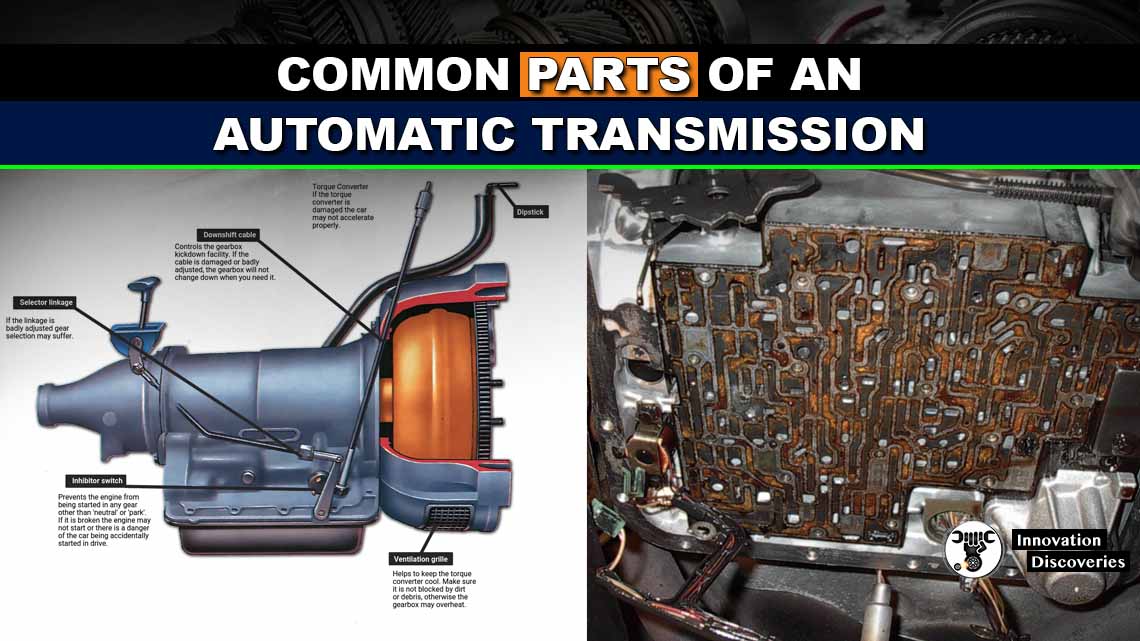
- Common Parts of an Automatic Transmission
- 4 Common Symptoms of Automatic Transmission Problems

One Comment