
Introduction:
Driving at night presents its challenges, but one aspect that often gets overlooked is the alignment of headlights. Misaligned headlights not only reduce visibility but also pose a significant safety hazard for drivers and pedestrians alike. In this comprehensive guide, we’ll explore why headlights tilt, how to identify misalignment, and provide a detailed step-by-step process for properly aligning headlights.
Why Headlight Alignment Tilts?
Before delving into the alignment process, it’s essential to understand why headlights may become misaligned in the first place.
Several factors can contribute to misalignment, including wear and tear, changes in vehicle height due to suspension modifications or cargo load, and even minor collisions or bumps.
Over time, these factors can cause headlights to tilt, resulting in uneven illumination and compromised visibility.
Also, read – Types of Lighting Sensors
How To Determine Incorrect Headlight Adjustment?
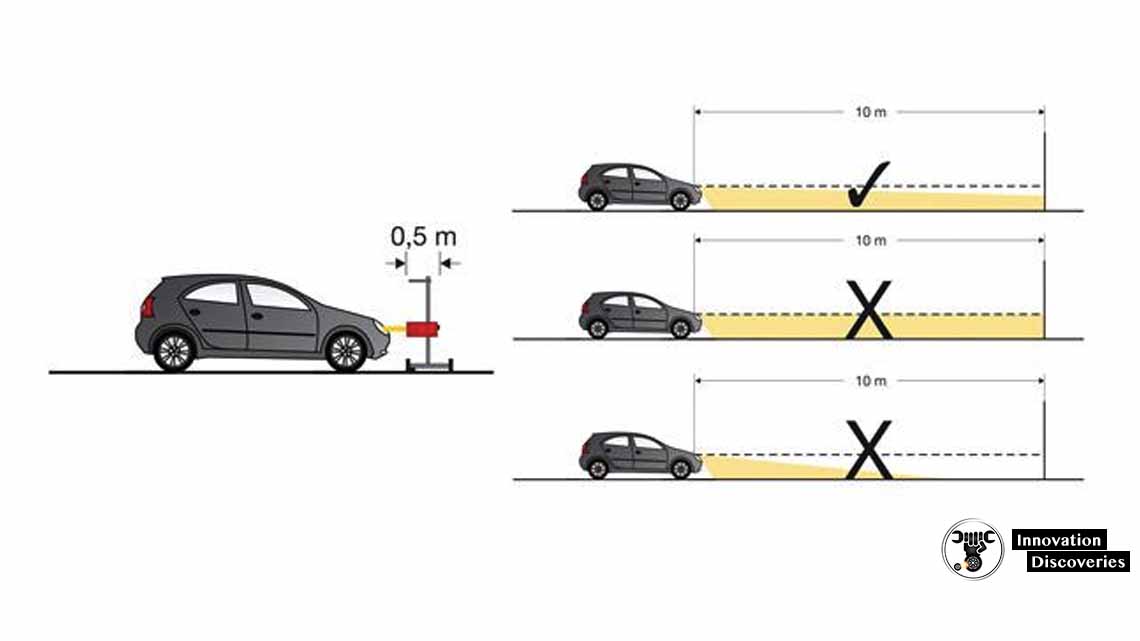
Identifying misaligned headlights is crucial for safe driving. Common signs of misalignment include uneven illumination on the road, excessive glare to oncoming drivers, or a noticeable difference in the height of the light beams.
Additionally, you may observe that the light pattern appears skewed or misshapen, indicating that adjustments are necessary.
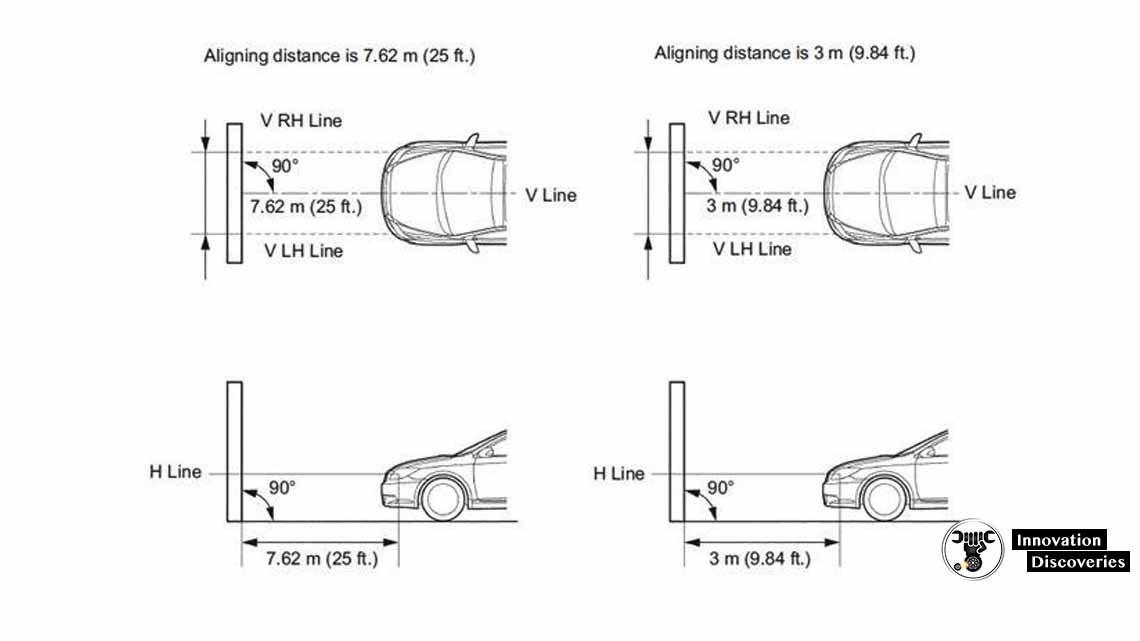
Park the car. Now, park the car exactly 25 feet away from the wall.
How To Get The Proper Aiming Headlights?
Properly aligning headlights not only enhances visibility but also ensures the safety of everyone on the road.
Fortunately, aligning headlights is a straightforward process that can be done with basic tools and a little patience. Let’s walk through the steps:
Also, read – Types of Lighting Sensors
Steps To Aim And Adjust Headlights
Preparation Step: Manual & Tools
Begin by consulting your vehicle’s manual to locate the headlight adjustment screws. These screws are typically located near the headlight housing and may require a Phillips or Torx screwdriver for adjustment. Additionally, gather masking tape to mark the wall and a measuring tape to measure the height of the headlights from the ground.
Note there are 2 types of screws:
Understanding the function of each adjustment screw is essential for achieving precise alignment. The horizontal adjustment screw controls the left and right movement of the headlight beam, while the vertical adjustment screw manages the up and down movement. Familiarize yourself with these screws before proceeding with the alignment process.
Step 1:
Location Select a flat surface to park your vehicle, ideally facing a flat wall or garage door approximately 25 feet away. Parking on a level surface ensures accurate measurements of the headlight height and alignment. Additionally, ensure that the vehicle is parked perpendicular to the wall to avoid skewed measurements.
Step 2:
Measuring & Marking With the vehicle parked, measure the height of each headlight from the ground using a measuring tape. Mark these measurements on the wall using masking tape, making sure to mark the exact height of each headlight. These marks will serve as reference points during the alignment process.
Step 3:
Car Preparation To prevent any accidental adjustments to the wrong headlight, cover one headlight with a cloth or cardboard while aligning the other. This precaution ensures that only one headlight is adjusted at a time, minimizing confusion and errors.
Step 4:
Three Marks Turn on the headlights and observe the light beams projected onto the wall. Identify the brightest spot of each light beam and mark the center of these spots on the wall using masking tape. These marks will help you align the light beams accurately later in the process.
Step 5:
Back Again Carefully back your vehicle up 25 feet from the wall, ensuring it remains perpendicular to the wall. Once positioned, observe the alignment of the light beams with the marks you made earlier. The brightest spots of the light beams should align with the corresponding marks on the wall. If necessary, make adjustments to the vehicle’s position until proper alignment is achieved.
Step 6:
Positioning Using the appropriate adjustment screws, begin aligning the light beams with the marked points on the wall. Turn the screws clockwise to raise the beam and counterclockwise to lower it. Make small, incremental adjustments, continually checking the alignment until both headlights are properly aimed. Take your time during this process to achieve precise alignment and ensure optimal visibility on the road.
Conclusion:
Properly aligned headlights are essential for safe driving, particularly during nighttime conditions. By following the step-by-step guide outlined above, you can ensure that your headlights are correctly aimed, improving visibility and safety for yourself and other road users.
Remember to regularly check and adjust your headlights to maintain optimal alignment, providing you with a clear view of the road ahead and reducing the risk of accidents.
Safe driving starts with proper headlight alignment, so take the time to ensure that your headlights are aligned correctly for every journey.
Discover More:

Read: 6 KILLER TIPS FOR CAR HEADLIGHT REPAIR AND INSTALLATION
COMPLETE DASHBOARD LIGHT SYMBOLS


2 Comments